


Custom event tents are more than just shelters – they’re a key part of your brand’s visibility at trade shows, festivals, and corporate events. The right tent can attract attention, generate leads, and even extend your reach through social media. Here’s what to focus on before ordering:
- Size: Match your tent to your event needs. A 10×10 ft tent works for most trade shows, while larger sizes like 10×20 ft are better for heavy foot traffic.
- Frame Material: Aluminum frames are lightweight, rust-resistant, and durable for frequent use. Steel is cheaper but heavier and prone to rust over time.
- Fabric Quality: Opt for UV-resistant, waterproof materials like 600D Oxford polyester or 1000D laminated vinyl for durability.
- Branding: Use full-color printing for bold, lasting graphics. Place logos and taglines strategically for maximum visibility.
- Weather Resistance: Choose tents with sturdy frames, waterproof fabrics, and proper anchoring for stability in wind and rain.
- Ease of Setup: Pop-up designs with quick-release pins or telescopic legs make assembly fast and simple.
- Accessories: Add sidewalls, rain gutters, flags, and lighting to improve functionality and appearance.
A well-chosen tent combines durability, professional design, and ease of use, making it a long-term asset for your business.
Choose the Right Tent Size
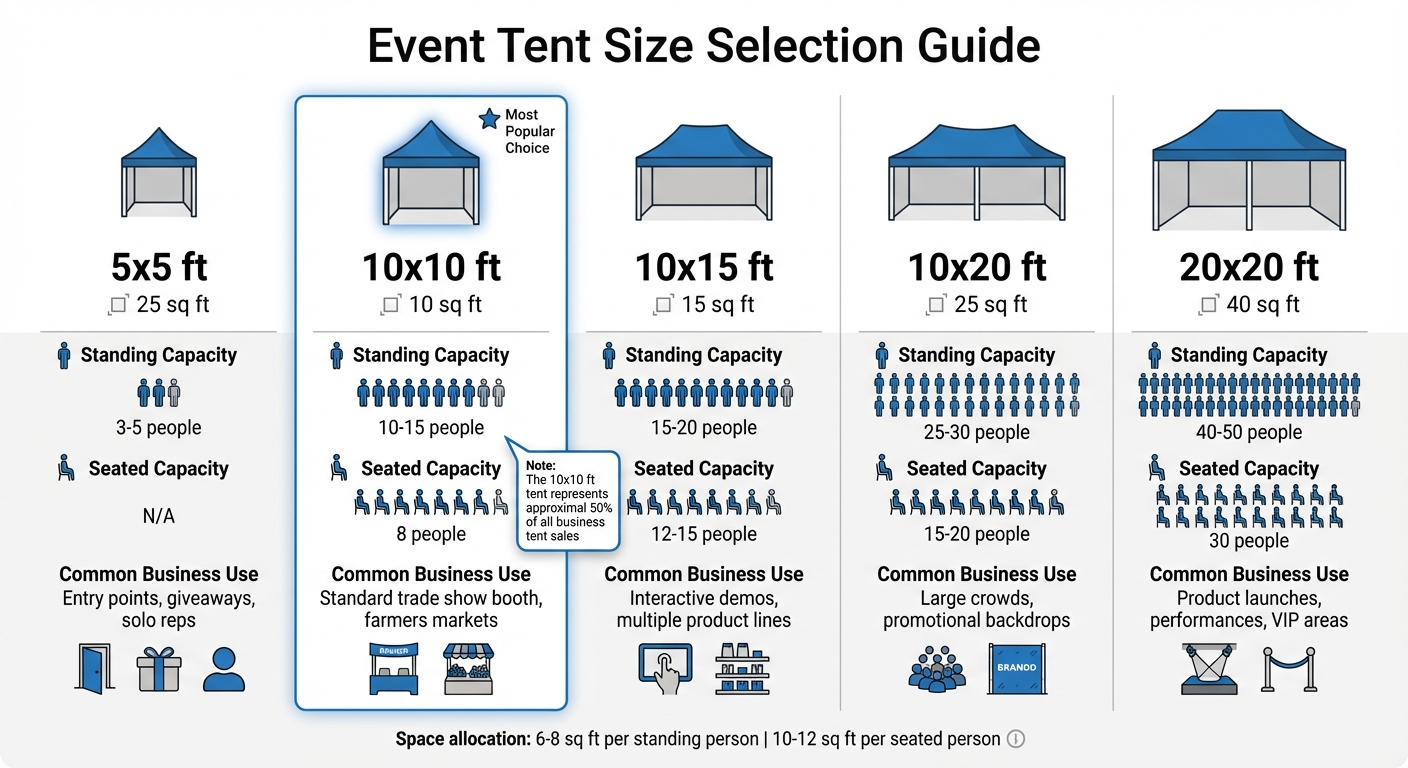
Event Tent Size Guide: Capacity and Business Use Comparison
Picking the right tent size can make or break your event setup. A tent that’s too small can leave you scrambling for space, while one that’s too large can feel empty and unbalanced. The goal is to create a professional, functional space that works seamlessly with your needs.
Measure Your Space and Event Needs
Start by confirming your booth dimensions with the event organizer. Many trade shows stick to a standard 10×10 ft space, while festivals often allow for larger setups, like 10×20 ft or more. Once you know your limits, think about peak traffic hours instead of total attendance when estimating capacity. You don’t want to overplan and end up with wasted space.
For standing room, allocate 6 to 8 square feet per person. For example, a 10×10 ft tent (100 square feet) comfortably fits 10 to 15 people standing. If you’re planning for seating – say, for product demos or consultations – you’ll need 10 to 12 square feet per seated guest. Don’t forget to leave room for tables, racks, or equipment.
Here’s a quick guide to help you choose:
| Tent Size | Square Footage | Standing Capacity | Seated Capacity | Common Business Use |
|---|---|---|---|---|
| 5×5 ft | 25 | 3-5 | N/A | Entry points, giveaways, solo reps |
| 10×10 ft | 100 | 10-15 | 8 | Standard trade show booth, farmers markets |
| 10×15 ft | 150 | 15-20 | 12-15 | Interactive demos, multiple product lines |
| 10×20 ft | 200 | 25-30 | 15-20 | Large crowds, promotional backdrops |
| 20×20 ft | 400 | 40-50 | 30 | Product launches, performances, VIP areas |
The 10×10 ft tent is the most popular choice, making up about half of all business tent sales. It’s compact enough for most vendor spaces while still offering good visibility and easy transport. But if you’re expecting heavy foot traffic or need extra room for displays, a 10×20 ft tent provides twice the space and helps avoid overcrowding during busy times.
Once you’ve settled on a size, make sure your tent is easy to move and store.
Think About Portability and Storage
Size directly impacts how easy your tent is to transport and store. A 10×10 ft pop-up tent typically folds into a wheeled carrying case, fits in most standard cars, and can be set up by one or two people. On the other hand, larger tents like 20×20 ft models require a cargo van, a team for assembly, and dedicated storage space.
"The foremost reason you are better off with the 10x sizes is that they can be prepared and fully customized in the least amount of time." – Lush Banners
For frequent events, aluminum frames are a smart choice. They’re about one-third the weight of steel, making them easier to transport without compromising durability. If your events vary in size, modular designs can be a lifesaver. For instance, two 10×10 ft tents can be connected to create a 10×20 ft space, giving you flexibility while keeping storage manageable.
Check Material and Frame Durability
The durability of your tent’s frame and fabric plays a huge role in its lifespan and ability to perform under stress. A weak frame or subpar fabric can fail when you need it most, damaging your brand image and leading to higher replacement costs. Spending a bit more on quality materials upfront can save you money – and stress – over time.
Aluminum vs. Steel Frames
The material of the frame is key to a tent’s durability, impacting everything from weight to weather resistance. Let’s break it down:
- Aluminum frames are incredibly lightweight – about one-third the weight of steel – making them much easier to transport and set up. Despite being lighter, aluminum frames can feature walls up to 2mm thick, which is double the thickness of most steel frames. This offers excellent stability without adding bulk. One of aluminum’s standout features is its natural resistance to rust. When anodized, its protective oxide layer becomes significantly tougher, creating a surface that’s extremely hard and durable. Premium aluminum tents also use metal connectors instead of plastic joints, further boosting structural strength.
"Aluminum is three times lighter than steel, meaning an aluminum tent frame can be as thick or thicker than a steel frame while still being lightweight and easy to manage." – Mastertent
- Steel frames, on the other hand, are a budget-friendly option for occasional use. They’re suitable if you only plan to use your tent a few times a year in mild weather. Steel tents (10×10 ft) typically range in price from $399 to $699, while aluminum tents in the same size cost between $899 and $2,899. However, steel frames rely on powder coating to resist rust. Once that coating chips or cracks, the frame becomes vulnerable to corrosion.
If you’re setting up frequently – whether weekly or monthly – aluminum is a better investment. Aluminum frames often come with warranties ranging from 5 years to a lifetime and are wind-tested to handle speeds of 62 to 75 mph. Steel frames, by comparison, usually offer warranties of just 1 to 2 years.
Select Quality Tent Fabrics
The fabric of your tent is just as important as the frame. It needs to handle sun, rain, and repeated use without wearing out. Two popular options are:
- 600D Oxford polyester: This water-resistant material is pliable and stays attached to the frame during storage, making it a convenient choice.
- 1000 denier laminated vinyl: For heavy-duty needs, this fabric offers exceptional strength and durability. Fabrics weighing 16 oz or more are considered commercial-grade and can withstand rigorous use.
UV resistance is critical. Without it, vinyl can become brittle, crack, and fade in just a few years. U.S.-made, UV-resistant vinyl, on the other hand, can last over seven years – three times longer than many imported fabrics. Vinyl is also fully waterproof, making it great for outdoor events. However, it requires careful handling to protect printed graphics and should be removed from the frame before storage. Polyester is easier to manage but doesn’t last as long.
Make sure your fabric meets NFPA 701 and California Fire Marshal standards for flame retardancy, especially if your events have strict safety regulations. Use a drop cloth during setup and takedown to avoid pinholes or abrasions that could let light through. And always store your tent completely dry to prevent mold and mildew, which can weaken the material over time.
Ultimately, choosing high-quality materials for both the frame and fabric ensures your tent not only holds up under frequent use and tough weather but also reflects a professional image for your brand. A well-made tent is an investment in reliability and performance.
Customize Your Tent Design for Branding
Your tent is more than just a shelter – it’s a mobile billboard that represents your business and amplifies your event presence. Customizing your tent effectively can transform it into a marketing powerhouse that builds trust and grabs attention. In fact, consistent branding across all materials can increase revenue by up to 23%, making thoughtful design a smart investment.
Use Full-Color Printing
Full-color dye sublimation printing turns your tent into a vibrant, eye-catching display. Unlike screen printing, which places ink on the fabric’s surface, dye sublimation embeds ink directly into the fibers. This process creates bold, edge-to-edge graphics that resist cracking, peeling, or fading – even after heavy outdoor use.
"A well-printed canopy does more than provide shade – it acts as a billboard for your brand. It communicates your story, draws attention, and invites engagement." – Branded Canopy Tents
Strategic placement of branding elements is key. Place your main logo at the peak of the canopy for visibility from a distance. Use the valance for taglines, your website, or social media handles, as these details are at eye level and easy to read. Reserve the sidewalls for product photos, QR codes, or detailed graphics to create an engaging experience for visitors who step closer. Choose colors that stand out in your event setting – bright shades work well outdoors, while darker tones can offer a sleek look for indoor trade shows.
To further elevate your tent, consider adding branded accessories that complement your design.
Add Branded Accessories
Take your branding to the next level with customized accessories. Leg banners add a vertical element to your display, giving it a polished and professional look. Branded table covers (starting at $55) ensure every surface reinforces your identity, while feather flags (starting at $49) extend your visibility, drawing attention even before attendees approach your tent.
Keep your design clean and uncluttered. White space, or negative space, ensures your message is easy to understand at a glance. Always use vector file formats for logos to maintain sharpness when scaling up for large prints. Since custom printed products typically require 1 to 2 weeks for production and delivery, plan ahead. To maximize versatility, avoid adding event-specific dates or messages to the main canopy, so you can reuse the tent for multiple campaigns throughout the year.
These thoughtful design touches not only improve brand recognition but also enhance the overall impact of your event setup. By aligning your tent’s design with its functional features, you create a cohesive and professional display that leaves a lasting impression.
sbb-itb-c623e60
Look for Weather Resistance and Easy Setup
When selecting a tent, it’s not just about how sturdy or customizable it is – weather resistance and ease of setup are equally important. Whether you’re facing unpredictable weather or juggling a packed event schedule, these factors can make or break your experience.
Verify Weather-Resistant Features
A tent’s ability to withstand harsh conditions starts with its frame. For reliable performance, choose 12-gauge anodized aluminum frames (about 2mm thick). These frames are not only lightweight but also resistant to rust and corrosion, making them a better long-term option than steel. To put this into perspective, a professional 10×10 ft tent typically weighs around 75 lbs, while recreational models often weigh just 50–60 lbs and use thinner materials (less than 1mm thick), which compromises durability.
"If your tent can’t handle the elements, it’s not built for real events." – Andrew Dodson, TentCraft
The fabric is just as important as the frame. Look for 600-denier polyester or vinyl-coated materials with heat-sealed or double-stitched seams to prevent leaks. A high-pitch roof design is another must – it encourages water runoff, preventing pooling that could collapse the frame under the weight of accumulated water. UV-resistant coatings are also a smart choice, offering protection from sun damage for both the fabric and the people underneath it.
Anchoring is critical, too. On hard surfaces like concrete, plan for about 200 lbs of ballast weight (roughly 50 lbs per leg). For grassy areas, use tent stakes driven at a 45-degree angle for extra stability.
Choose Tents with Quick Assembly
When time is tight, a tent that sets up quickly is a lifesaver. Pop-up tents with accordion-style frames can be assembled in under 10 minutes – sometimes even in just 2–3 minutes. This is especially helpful when you’re managing multiple tasks or dealing with last-minute changes.
"One or two people can set it up quickly." – TentCraft
Features like telescopic legs with quick-release pins or spring-loaded buttons make height adjustments simple and tool-free. A center mast hub system allows one person to lift the roof from the middle, eliminating the need for a team effort. For added convenience, look for canopies that stay attached during storage, cutting down on prep time. Rolling carry bags are another great addition, letting one person transport the tent with ease.
Straight-legged designs are also worth considering – they’re easier to set up in crowded spaces like farmers’ markets or trade shows compared to slanted-leg models. These thoughtful details can turn a stressful setup into a seamless process.
Add Accessories for Better Functionality
Once you’ve ensured your tent is sturdy, customizable, and easy to set up, the next step is to enhance its functionality with the right accessories. These additions can transform a simple tent into a fully equipped, professional space that meets both practical needs and branding goals.
A tent is just the starting point – accessories take it to the next level. From weather protection to creating a more polished look, these extras solve real-world challenges while making your brand stand out.
Here are some key accessories to consider for boosting your tent’s usability and visual appeal.
Sidewalls, Rain Gutters, and Other Add-Ons
Sidewalls are a game-changer when it comes to versatility. Full sidewalls provide excellent protection from wind, rain, and cold, making them perfect for overnight security or creating private spaces for meetings. Half sidewalls are great for areas like serving stations or registration desks, offering crowd control and extra branding opportunities at eye level without fully closing off the space. For events in warmer weather, mesh sidewalls allow airflow while keeping insects at bay. If you’re looking to add shade and branding without obstructing entry points, triangle accent panels are a smart option.
"Sidewalls ensure your tent, guests, and event decor stay dry and secure even in inclement weather." – American Tent
If you’re using multiple tents, rain gutters are a must-have. Made from durable 600D Oxford cloth, they connect canopies to keep rainwater from dripping onto guests or products. For added functionality, tent counters can be clamped directly onto the frame, providing a stable surface for product demos, registration, or transactions.
To increase visibility in crowded spaces, peak flags and wing banners are excellent options. Some models can reach heights of nearly 17 feet, making your branding impossible to miss. Inside the tent, LED lighting keeps things running smoothly during evening events or in dimly lit venues. For comfort and cleanliness, flooring options like foam mats or rubber tiles are ideal, especially when set up on uneven or outdoor surfaces. These accessories not only improve the experience for your team but also create a more inviting space for visitors.
Conclusion
Ordering a custom event tent is more than just a purchase – it’s an investment in your event’s success and your brand’s visibility. From selecting the right size to ensuring durability and ease of setup, every detail matters.
Start by choosing a tent size that fits your event’s layout and accommodates your needs. For the frame, consider materials like aluminum for its lightweight durability or steel if you need extra stability. Pair this with high-quality fabrics like PVC-coated polyester, which offer resistance to UV rays, water, and fire. While budget options might seem tempting, investing in sturdy materials can save you from costly repairs or replacements later.
Remember, your tent is also a branding opportunity. Eye-catching, full-color graphics and practical accessories like sidewalls or flags can enhance both functionality and your brand’s presence. Additionally, ensure your tent complies with fire safety standards like CPAI-84 or NFPA-701, especially for professional venues.
Finally, opt for a design that’s easy to assemble without tools, allowing your team to focus on engaging with attendees instead of struggling with setup. A well-chosen tent not only meets the practical needs of your event but also reinforces your branding, offering long-term value for your business.
FAQs
What tent size fits my booth and crowd?
Picking the right tent size comes down to how much space you’ll need for your products, staff, and visitors. A 10×10-foot tent is a go-to option for smaller or medium-sized setups. It provides enough room for displaying items and engaging with visitors without feeling cramped.
If you’re expecting bigger crowds or have a more elaborate layout, larger sizes like 10×20 or 10×30 might be a better fit. Take some time to map out your setup beforehand. This helps ensure there’s enough room for people to move around comfortably while also meeting the venue’s space guidelines.
Aluminum or steel frame for my use?
When deciding between aluminum and steel frames, it all comes down to what you need in terms of durability, weight, and lifespan.
- Aluminum frames are lightweight, making them easier to handle and transport. They also resist rust, which makes them a great choice for outdoor use, especially if you’re setting up and breaking down frequently.
- Steel frames, on the other hand, are heavier but much sturdier. They can withstand stronger winds and are better suited for heavy-duty use, making them ideal for more demanding or long-term setups.
For most businesses, aluminum works well due to its portability and weather resistance. But if you’re dealing with extreme conditions or need something built to last under tough circumstances, steel might be the better option.
What add-ons do I really need?
Custom sidewalls and accent panels are must-have additions for event tents. These features not only boost branding and visibility but also add practical benefits. For example, they can offer extra shade or create specific display zones. Their versatility ensures your tent grabs attention and meets the functional demands of your event.


