


To stand out at events, your custom tent needs to do more than just provide shelter – it should grab attention, showcase your brand, and invite people in. A well-designed tent acts as a visual magnet, drawing attendees in just seconds. Here’s how to make it happen:
- Choose colors that pop: Use bold, high-contrast combinations that align with your brand while staying visible from a distance. For example, red and black for energy or navy and gold for professionalism.
- Keep graphics clean: Place large logos on the peaks for visibility, use simple fonts, and follow the 60-30-10 color rule to create balance.
- Add interactive features: QR codes, touchscreens, or live demos help engage visitors. Lighting, like LEDs or string lights, can make your tent stand out at night.
- Use durable materials: Opt for 600D polyester and dye-sublimation printing to ensure your tent withstands weather and looks professional.
- Pick the best spot: Position your tent in high-traffic areas and ensure branding is visible from all angles.
A custom tent is more than just a setup – it’s your brand’s first impression. By focusing on bold design, clear messaging, and quality materials, you can turn your tent into a hub of activity and engagement.
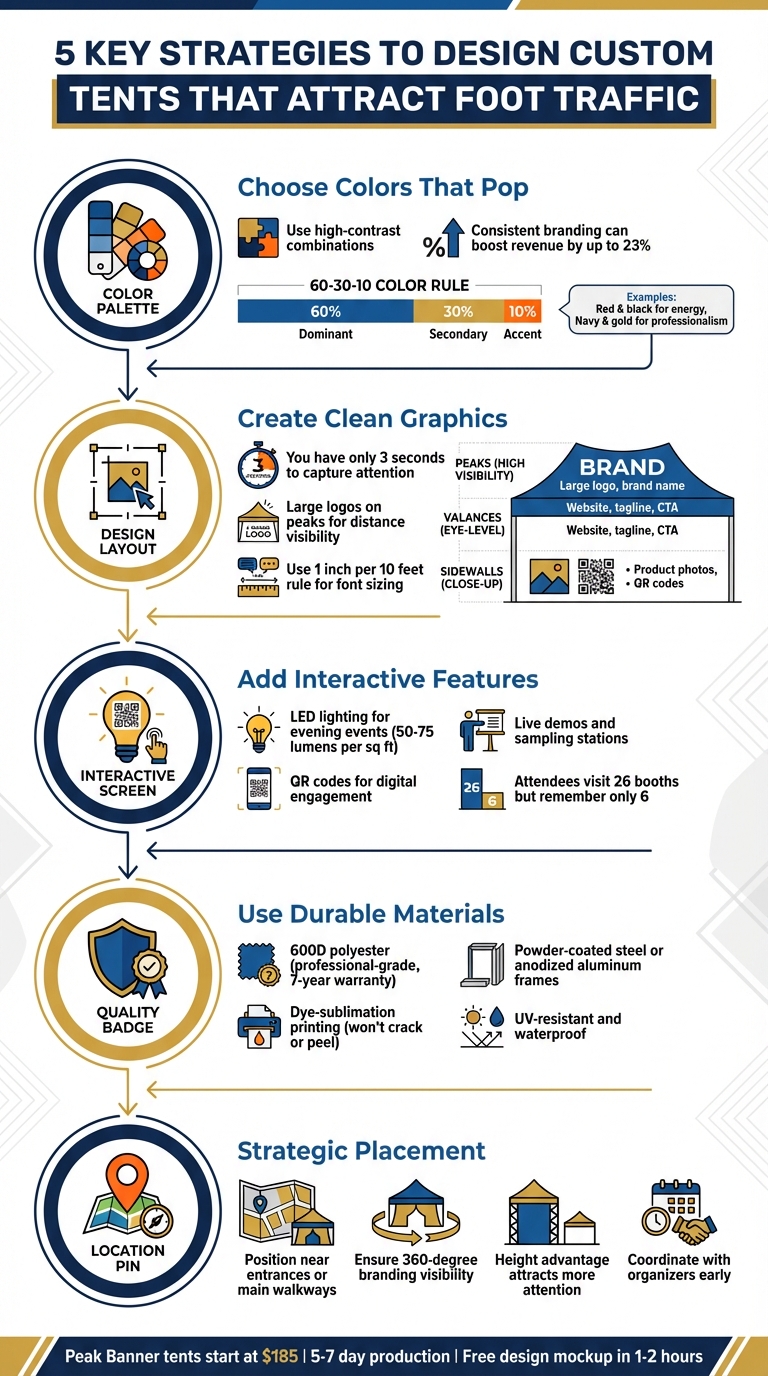
5 Key Strategies to Design Custom Tents That Attract Foot Traffic
Selecting Colors That Grab Attention
Color has an instant impact on emotions and behavior. At crowded events, you only have a few seconds to grab attention, and the right colors can make all the difference.
"Color in event printing isn’t just visual, it’s behavioral. It tells attendees where to look, how to feel, and what your brand stands for in a matter of seconds." – iDEKO
For example, red creates a sense of urgency and excitement, making it a great choice for sales events or product launches. Blue, on the other hand, conveys trust and professionalism, which is why financial and tech companies often favor it. Yellow and orange exude warmth and energy, making them ideal for community-focused brands. By understanding how different colors evoke emotions, you can align your choices with the experience you want to create. And when these colors match your brand identity, they help build instant recognition.
Match Colors to Your Brand Identity
Your event tent should feel like an extension of your brand. Consistent branding can boost revenue by up to 23%, and your tent acts as a portable representation of your business. It should reflect the same visual elements as your website, packaging, or storefront.
Take The Habit Burger Grill, for instance. They use their signature red canopy at events to maintain immediate brand recognition. Similarly, JP Morgan Asset Management incorporates custom tents with full-color gradient artwork to match their high-end image at upscale outdoor activations. These choices help brands appear familiar and trustworthy, even in new environments.
If you’re working with a tight budget, custom tent colors might feel out of reach, as they typically cost about 20% more than standard options. In such cases, stick to standard colors but ensure your brand’s specific shades are used in printed graphics and logos to maintain consistency.
Use High-Contrast Color Combinations
At events, visibility is everything. Your tent needs to stand out and be easily readable, even from a distance. High-contrast color combinations are key to achieving this.
- Black and white: A clean, professional look that’s easy to read.
- Blue and orange: A bold yet approachable pairing, perfect for startups and tech companies.
- Red and black: Energetic and bold, great for gyms or automotive brands.
- Navy and gold: Polished and authoritative, ideal for corporate events or real estate.
"A clean, bold canopy is the #1 factor in whether people recognize your brand quickly and correctly. Overdesigning kills clarity and premium perception." – Nicole Falkiewicz
To create a balanced design, use the 60-30-10 rule: dedicate 60% of the design to your dominant brand color, 30% to a secondary color, and 10% to an accent color. This approach establishes a clear visual hierarchy and naturally draws the eye. Place large logos at the tent peaks for maximum visibility, while the valances are perfect for high-contrast text like your website or tagline.
One final tip: dark-colored tents might look striking, but they absorb more heat – something to keep in mind for outdoor summer events.
Next, we’ll dive into how to design graphics and layouts that take full advantage of these color strategies.
sbb-itb-c623e60
Creating Graphics and Layouts That Work
After selecting the right colors, it’s time to focus on designing graphics and layouts that grab attention and communicate clearly.
At crowded events, you have about three seconds to capture someone’s attention as they walk by your tent. That means your design needs to be instantly readable and visually appealing.
Keep It Simple and Strategic
Simplicity is your best friend here. The roof of your tent should be the cleanest, most straightforward part of your setup. Use large, bold logos and minimal text on the peaks so people can spot your brand from a distance. Save detailed information, like a tagline or call-to-action (CTA), for the valances, which are closer to eye level. Think of your tent like a billboard – if someone can’t read it in a single glance, it’s too busy. For extras like product photos, QR codes, or social media handles, reserve those for the sidewalls, where people will naturally be closer and more engaged.
Here’s a quick guide to what goes where:
| Tent Section | Visibility Level | Content |
|---|---|---|
| Peaks (Roof) | High (Distance) | Large Logo, Brand Name, or Mascot |
| Valances | Medium (Eye-Level) | Website URL, Phone Number, Tagline, CTA |
| Sidewalls | Low (Close-up) | Product Photos, QR Codes, Social Media Handles |
Use Whitespace to Your Advantage
Whitespace – or the empty space around your design elements – is just as important as the content itself. A clean layout with bold lines and plenty of breathing room will always outshine a cluttered design. Instead of cramming in text, use spacing to make your message pop. Well-spaced text not only appears larger but is also easier to read from a distance.
Font Choices Matter
The font you choose can make or break your tent’s visibility. Stick to sans-serif fonts for maximum readability. Avoid fonts with thin strokes, elaborate designs, or high contrast, as they tend to disappear when viewed from far away or under bright sunlight.
"A banner has seconds to do its job. The pieces that consistently win share the same DNA: a clear font, honest contrast, and generous spacing." – Tim Armstrong, Banner Printing Expert, Sign Servant
Follow the 1 inch per 10 feet rule for font size. For example:
- At 50 feet away, letters should be at least 5 inches tall.
- For events with a 25–40 foot viewing distance (like street fairs), aim for 3–5 inch letters.
- At larger outdoor festivals (75–120 feet), go for 8–12+ inch letters.
Keep your headlines short – ideally between 3 and 6 words – and limit yourself to one or two typefaces to avoid visual clutter.
Display Logos and Images Clearly
Your logo is the centerpiece of your branding, so it needs to look sharp and professional at any size. Use vector formats like AI, EPS, or PDF to ensure your logo scales perfectly without losing clarity.
If your logo includes intricate details or small text, simplify it for tent use. From 30 feet away, fine elements won’t be visible, so focus on bold, clean designs. To maintain consistency across materials, use Pantone colors instead of CMYK, ensuring your logo looks identical on your tent, banners, and table covers.
Lastly, avoid placing your logo on a plain white background. White tents can quickly show dirt at outdoor events. Instead, opt for an inverse logo (white logo on a colored background) to keep your setup looking polished and professional.
Adding Features That Make Your Tent Stand Out
Once your tent’s colors and graphics are on point, the next step is to include features that elevate it from a simple shelter to a space that draws people in and keeps them engaged. These additions can create an immersive experience that leaves a lasting impression.
Install LED Lighting for Evening Events
If your event continues after dark, lighting becomes a must-have. A well-lit tent not only stands out but also makes your space more inviting. Battery-powered LED uplights placed every 6–8 feet along the tent poles can highlight your structure and even showcase your brand colors. With 8–12 hours of battery life, these lights eliminate the need for outlets or messy extension cords.
For a softer, more atmospheric effect, consider using string or bistro lights arranged in creative patterns like canopies or parallels. You can also use gobo projectors to cast your logo onto the tent floor or entrance, creating a perfect spot for photos and reinforcing your branding.
"Luxury event tent lighting is a deliberate design discipline that pairs high-quality fixtures, layered controls, and tent-conscious placement to tell a cohesive visual story and leave a lasting impression." – Mary Kathryn, Managing Director at Curated Events
Even the color temperature of your lighting plays a role. Warm whites (2,700–3,200K) create a cozy and inviting vibe, while cooler whites (3,500–5,000K) feel more polished and professional, particularly for corporate events. To ensure even lighting, aim for 50–75 lumens per square foot.
These lighting choices not only enhance visibility but also set the stage for deeper engagement.
Add Interactive Elements
Lighting is just the beginning. To truly captivate your audience, incorporate interactive elements that invite participation and make your tent memorable. Static displays often fade into the background, but interactive features grab attention and create meaningful connections.
One simple way to bridge the gap between your physical tent and digital presence is by placing QR codes on banners or panels. These can direct visitors to product information, contests, or your social media channels. For a more hands-on experience, mount touchscreens on your tent frame to showcase product configurators or an interactive catalog. Multi-user touch tables can also encourage group interaction, fostering a sense of community.
Live demonstrations are another powerful tool. Whether you’re offering food samples or showcasing a product, seeing it in action often resonates more than a static description. For food and beverage events, sampling stations can turn casual visitors into enthusiastic participants. For other products, hands-on demos that let attendees touch, test, or try your offerings create a personal connection that sticks.
The stats back this up: trade show attendees typically visit 26 booths but only remember six. To be one of those standout experiences, design moments that are photogenic or surprising enough to encourage social sharing. A branded photo backdrop, a digital graffiti wall, or an augmented reality feature can inspire attendees to capture and share their experience, amplifying your reach far beyond the event itself.
Choosing Quality Materials and Tent Placement
Building on striking design and graphics, using the right materials and carefully choosing your tent’s location can turn it into a standout brand centerpiece.
Choose Durable, Weather-Resistant Materials
The materials you select directly affect how long your tent will last. Professional-grade 600D polyester is widely recognized as the go-to option. It’s waterproof, UV-resistant, flame retardant, and holds up well against fading. While 300D polyester is a more budget-friendly and lightweight alternative, it’s less durable and can tear with heavy use. Opting for 600D polyester often comes with added perks, like warranties of up to 7 years.
Don’t overlook the frame material either. Powder-coated steel is a solid choice for setups in windy conditions due to its weight and stability. On the other hand, anodized aluminum is lighter and resists rust, making it a better option for coastal or rainy environments. For added strength, look for frames with hexagonal legs instead of square ones – they’re sturdier and more reliable.
"Dye sublimation is the gold standard for our 600D Polyester because the ink soaks into the actual fabric. That’s why you’re not at risk of cracking/peeling." – TentCraft
When it comes to graphics, dye-sublimation printing is a smart investment. This method infuses ink directly into the fabric fibers, ensuring your designs won’t crack, peel, or fade – even after prolonged exposure to sun and rain. Plus, it handles gradients and intricate illustrations exceptionally well, outlasting screen printing or UV printing in vibrancy and durability.
Once you’ve chosen materials that stand the test of time, it’s time to focus on where to position your tent for maximum visibility.
Position Your Tent in High-Traffic Areas
Strategic placement is key. Set up your tent near entrances or along main walkways where people naturally pass by. If your booth is accessible from multiple sides, ensure your branding is visible from every angle to draw attention.
Height can make all the difference in a crowded venue. A tent that’s even slightly taller than its neighbors will stand out and attract more eyes. Coordinate with event organizers early to confirm your booth location. This allows you to tailor your branding – if you’re in a corner, you can skip printing on hidden sides, but island booths will need full 360-degree coverage.
Peak Banner Custom Logo Canopy Tents
Once you’ve nailed down your materials and placement, it’s time to pick a tent that truly amplifies your brand. Peak Banner’s custom logo canopy tents are designed to combine eye-catching visuals with long-lasting durability. Their commercial-grade construction and edge-to-edge full-color printing ensure your brand gets noticed.
Features and Benefits of Peak Banner Tents
Peak Banner uses advanced dye-sublimation printing to create vibrant, fade-resistant graphics that stay crisp and won’t crack or peel. The canopy is made from 600D UV-coated polyester, supported by your choice of powder-coated steel or rust-resistant aluminum frames – a combination built to last.
The 10×10 ft tent is a favorite among small businesses. It weighs 55 lbs and offers 120″ of width and depth. Setup is quick and easy, taking less than 5 minutes with two people. The frame expands and locks into place without any tools, and walls attach securely with Velcro straps.
"Our custom printed tents use advanced dye‑sublimation printing to produce full‑color, edge‑to‑edge graphics on every canopy panel… your tent will stand out from all sides with vibrant detail and crisp resolution." – Peak Banner
Pricing starts at $185.00 for a basic 10×10 ft canopy. For a full-color digital print version, the cost is $595.00. Optional modular walls – like full backs, half walls, or zippered doors – let you create a more defined branded space. Bulk discounts are available, and there’s no minimum order quantity. With their high-quality design and materials, these tents are perfect for increasing foot traffic and boosting brand visibility.
How to Order and Customize with Peak Banner
Getting started is straightforward. Choose your tent style and size, then pick from three design options: upload your logo for a free mockup within 1–2 hours, download a template to design it yourself, or let Peak Banner’s in-house design team handle it – at no extra cost. For the best results, submit logos in vector formats like AI, EPS, or PDF.
Once your design is approved, production takes 5–7 business days, with rush options available if you’re on a tight schedule. Shipping is available nationwide across all 50 states, complete with tracking. Customers consistently rate these tents 5.00/5 stars, often highlighting the vibrant colors, quick turnaround, and attentive support throughout the process.
Conclusion
Designing a custom tent that draws in foot traffic boils down to five key decisions: using high-contrast colors that stand out in your event setting, incorporating clean graphics with bold fonts and clear logos, adding eye-catching features like LED lighting or interactive elements, choosing durable materials that exude professionalism, and placing your tent where people naturally gather.
Each part plays a vital role. A bright canopy catches attention from afar, while crisp graphics create instant brand recognition. High-quality materials – like 600D UV-coated polyester and commercial-grade frames – showcase reliability, making visitors feel more at ease approaching your space. Placing your tent in high-traffic areas, paired with engaging features, turns casual onlookers into meaningful interactions.
"Your tent isn’t just shelter. It’s your statement… They build presence. They attract traffic. They drive sales." – CELINA
Peak Banner’s custom tents check all these boxes with fade-resistant dye-sublimation printing, sturdy frames, and free design support that provides a mockup in just 1–2 hours. With production times of only 5–7 business days and prices starting at $185.00, you can create a polished event presence without breaking the bank.
A well-designed tent does more than look great – it creates a space that invites people in, sparks engagement, and leaves a lasting impression long after the event is over.
FAQs
What size tent is best for my event?
The perfect tent size hinges on the type of event you’re hosting and how many people will attend. If you’re planning a small to medium gathering, a 10×10 canopy works well. It provides enough room while maintaining great visibility.
For larger crowds or more elaborate setups, a 10×20 tent or modular options might be a better fit, offering expanded coverage. When deciding, think about your branding objectives, the size of the audience, and the space available. Choosing the right tent ensures you make the most of your event.
How do I make my tent readable from far away?
When designing text for your tent, make sure it’s easy to read from far away. Use large, clear lettering, following the guideline of 1 inch in letter height for every 10 feet of viewing distance. Choose bold, sans-serif fonts for better readability, and keep your message straightforward. For maximum visibility, go with high-contrast color combinations, such as dark text on a light background, to make your design pop.
Which add-ons boost booth engagement the most?
Want to draw more attention to your booth? Incorporating customized signage, vibrant flags, and distinctive visual elements can make all the difference.
- Custom-printed flags: Bold colors and prominently displayed logos on flags can instantly grab attention and help people spot your booth from afar.
- Personalized signage: Tailor-made signs not only communicate your brand but also leave a lasting impression on visitors.
- Themed décor or accent panels: These unique touches create a memorable atmosphere, making your booth feel inviting and aligned with your brand’s personality.
Together, these elements make your booth more noticeable in a sea of competitors, increasing foot traffic and engagement.


