


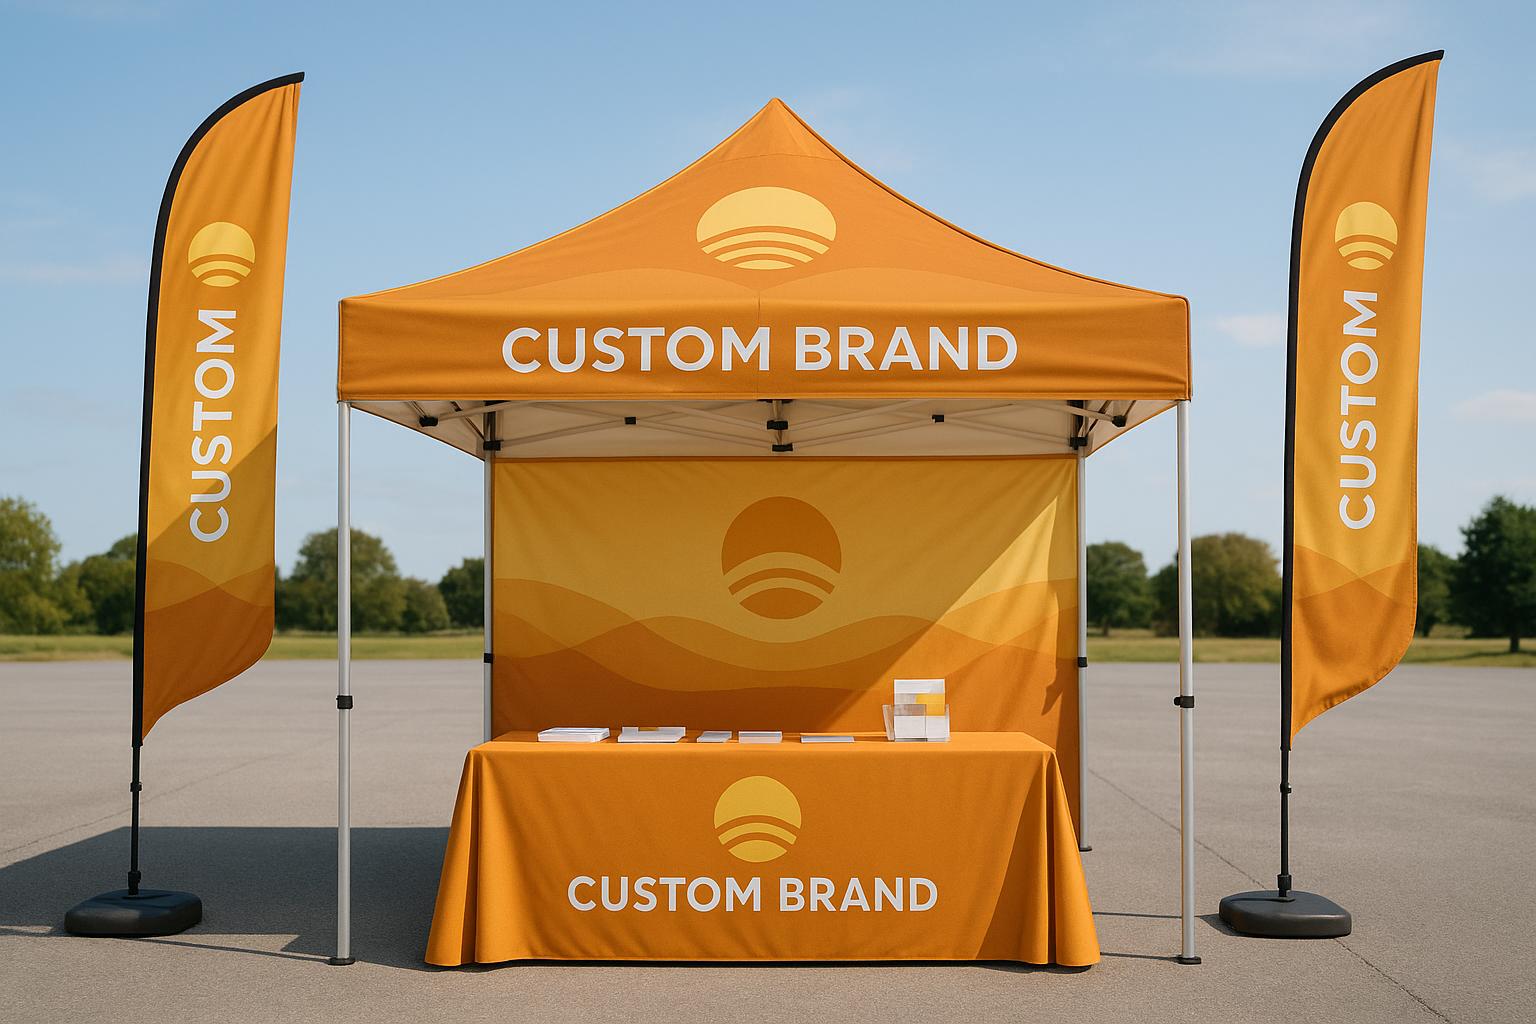
Your event booth is your first chance to grab attention. A well-designed setup can make your brand stand out, attract visitors, and create a lasting impression. The key? Combine three essential elements: a custom canopy tent, branded table cover, and promotional flags. Together, these elements create a visually striking and functional display that works for any event, whether indoors or outdoors.
Here’s what you need to know:
- Custom Canopy Tents: Define your space, showcase your logo, and provide shade or shelter.
- Branded Table Covers: Keep your booth tidy, reinforce branding at eye level, and create a polished look.
- Promotional Flags: Add height and visibility to your booth, drawing attention from a distance.
The 3 Main Components of Your Event Setup
Creating a standout event display starts with three key elements: canopy tents, table covers, and flags. Each plays a unique role in shaping your booth’s overall impact. Let’s break them down.
Custom Canopy Tents
The canopy tent is the backbone of your event setup. It defines your space and serves as the most prominent platform for your branding. Imagine it as the centerpiece of your booth – the first thing attendees notice in a sea of displays.
Beyond showcasing your logo, canopy tents offer practical benefits. They provide shade from the sun, shelter from unexpected rain, and a clear boundary that separates your booth from others. This defined area makes it easier for visitors to approach and engage with your team.
The canopy’s elevated position is a game-changer for visibility. Your logo, displayed high above the ground, stands out even in a crowded venue. This is especially important at events with numerous booths vying for attention. A custom-printed canopy ensures your brand remains noticeable, whether attendees are across the room or right in front of your booth.
Canopy sizes typically range from 10 ft x 10 ft for smaller setups to 10 ft x 20 ft for larger events. When choosing a tent, think about both its functionality – like weather resistance and ease of assembly – and how it can amplify your branding efforts.
Next, let’s explore how table covers add a polished touch to your display.
Branded Table Covers
Table covers bring your branding to eye level, where attendees naturally focus during conversations. They’re essential for creating a clean, professional look while reinforcing your brand message.
One of their most practical benefits? They hide the clutter. A branded table cover neatly conceals storage boxes, extra inventory, or personal items stored underneath the table. This keeps your booth looking tidy and ensures visitors focus on your products or services, not the mess.
Table covers come in various styles to suit your booth’s aesthetic. Loose covers drape elegantly on all sides, offering a classic look. Fitted covers hug the table tightly, giving a more tailored appearance. Stretch fabric covers provide a sleek, modern finish by eliminating wrinkles and bunching. Most are designed to fit standard 6 ft or 8 ft tables, common at most events.
With customization options, you can match your table cover’s design to your canopy, creating a cohesive and professional look across your entire booth.
Now, let’s see how flags add a vertical boost to your display.
Promotional Flags
Flags bring vertical visibility to your booth, ensuring your branding stands out even from a distance. While canopy tents and table covers focus on your immediate space, flags rise above the crowd, catching the attention of attendees from far away. This added height is especially valuable at outdoor events or in large convention centers.
The movement of flags in the wind adds a dynamic element that naturally draws the eye, making your booth more noticeable among static displays.
Flags come in various styles to suit different needs. Feather flags feature a teardrop shape that maximizes the printing area. Frame-mounted flags attach directly to your tent for seamless integration. Standalone flags have their own bases and can be placed strategically around your booth or even further out to direct foot traffic toward your space.
When combined with your canopy tent and table cover, flags complete a powerful visual strategy. Together, they create a "branding triangle" – overhead visibility with the canopy, eye-level engagement with the table cover, and vertical attention with the flags. This layered approach ensures your booth is impossible to miss, no matter where attendees are in the venue.
How to Choose the Right Products for Your Event
Choosing the right products for your event involves aligning your setup with the venue, weather, and display requirements. Every piece should work together seamlessly to create a cohesive and eye-catching presentation.
Selecting Your Canopy Tent
When it comes to canopy tents, prioritize ease of setup, durability, and the right size for your space. A lightweight yet sturdy option is ideal for most event environments. For a professional touch, consider custom logo canopy tents from Peak Banner, designed to enhance your brand’s visibility.
To complete your booth’s appearance, a custom table cover can tie everything together and reinforce your branding.
Designing Your Table Cover
Table covers not only conceal storage but also act as a powerful branding tool.
Here are two popular styles to consider:
- Draped Covers: These hang loosely over the table, offering a classic, adaptable look.
- Stretch-Fit Covers: These fit snugly, providing a sleek, wrinkle-free appearance with secure attachments.
Opt for durable materials like Dacron poplin, which supports high-quality dye sublimation printing for vibrant, eye-catching designs. Table covers are available in standard sizes (4, 6, 8, and 10 ft), so take accurate measurements to ensure the perfect fit. Position your logo and key messages prominently to make your booth stand out in a crowd.
Once your table is set, complete your display with flags that enhance visibility and attract attention.
Picking the Right Flags
Flags are a great way to grab attention and define your event space. Choose a design that highlights your message and complements the rest of your display. Whether you prefer a sleek, curved silhouette or a traditional rectangular shape, strategic placement is key to maximizing visibility. Peak Banner offers custom printed flags with vibrant, full-color designs tailored to suit your event needs.
Creating a Consistent Event Display Design
A cohesive look across your tent, table cover, and flags makes your booth instantly recognizable. When attendees see the same colors, fonts, and messaging repeated throughout your display, it reinforces your brand and creates a polished, professional impression.
Think of your event setup as one unified design rather than separate pieces. Each element should work together to tell your brand’s story. This consistency helps visitors quickly understand your message and builds trust even before they approach your booth.
Matching Colors and Branding
Your brand colors are key to creating a unified look. Start by identifying your main brand colors – usually two or three shades from your logo or marketing materials. Use these colors consistently across all display elements but vary their proportions to keep the design visually interesting.
A good rule of thumb is the 80-20 rule: dedicate about 80% of the design to your primary brand color and use secondary colors for the remaining 20%. For instance, if your brand colors are navy blue and orange, you might design a navy tent with orange accents, a table cover with an orange base and navy details, and flags that balance both colors. This approach keeps everything cohesive while adding variety.
Avoid introducing colors that aren’t part of your brand guidelines. Even if a new color looks appealing, it can dilute your brand’s identity. To make your colors stand out in a crowded event space, consider using white or neutral backgrounds as a base.
Fabric choice plays a big role in maintaining color consistency. Different materials absorb and reflect dye differently, which can cause slight variations in color between your tent, table cover, and flags. To avoid this, request fabric samples before finalizing your designs. Dye sublimation printing is often the best option for vibrant, consistent colors across various fabrics.
Once your colors are set, focus on strategic logo placement to maximize visibility.
Placing Logos and Messaging
Consistent logo placement across all display elements strengthens your branding. For your tent, position your logo on the canopy’s valance at a height of 6–7 feet to ensure it’s visible from all angles. Adding your logo to the back wall of the tent ensures that even people walking behind your booth see your branding.
On table covers, center your logo on the front panel facing foot traffic. For a 6-foot table, aim for a logo size of 12–18 inches wide to maintain balanced visibility. Leave space around the logo for a tagline or key message, using a font size that’s readable from 10–15 feet away.
Flags are great for drawing attention upward. Place your logo in the top third of the flag where it’s most visible. If you’re using multiple flags, alternate between logo-focused designs and message-focused designs to create a dynamic, engaging look.
Keep your messaging short and consistent across all elements. Focus on a single core message or value proposition and adapt it slightly for each piece. For example, your tent could say “Custom Printing Solutions,” your table cover might feature “Vibrant Full-Color Prints,” and your flags could highlight “Fast Turnaround.” This approach reinforces your offering without sounding repetitive.
Font consistency is another important detail. Stick to one font family, using no more than two fonts – one for headlines and one for body text. Sans-serif fonts like Arial or Helvetica work well because they’re easy to read from a distance.
Make sure there’s enough contrast between your text and background colors. Light text on dark backgrounds or dark text on light backgrounds ensures readability in any lighting. Test your designs at smaller sizes – if the text is hard to read as a thumbnail, it won’t be legible from across the event space.
Lastly, consider how people naturally scan displays. Attendees often follow a Z-pattern: from the top left to the top right, diagonally down to the bottom left, and across to the bottom right. Place your logo and key message along this path to grab attention and make your display more effective.
sbb-itb-c623e60
Setting Up and Maintaining Your Display
Getting your display set up correctly and keeping it in top shape is key to making a lasting impression and ensuring your materials last through multiple events. A smooth setup not only saves time but also establishes a polished, professional look, while proper care keeps your display looking sharp.
Step-by-Step Setup Instructions
Start your setup early, beginning with the canopy tent, as it takes the longest to assemble.
Setting up the tent is easier with two people. Lay the frame flat on the ground and extend the legs fully. Once the frame is ready, lift it and carefully drape the printed canopy fabric over the top, starting with one corner and working your way around. Secure the fabric using the velcro straps or clips provided. For outdoor events, add weight bags or stakes to keep the tent stable in varying weather conditions.
If your tent includes back or side panels, attach them using the clips or velcro strips provided. Adjust the tension to ensure they hang straight and smooth. For tents with a valance, double-check that your logo is centered and correctly positioned before securing it.
Setting up your table cover is simple but requires attention to detail. Place your table a few feet inside the tent to create an inviting entryway. Drape the cover over the table so the logo on the front panel is clearly visible to visitors. Smooth out wrinkles by pulling the fabric outward from the center. If the cover has fitted corners, tuck them neatly under the table legs for a clean look.
To position your flags for maximum visibility, place them at the outer corners of your booth space. Angle them slightly inward to draw attention to your display. When assembling the flag poles, make sure the sections are securely connected. For outdoor setups, use ground stakes to anchor them deeply and at the correct angle for stability. If you’re using multiple flags, arrange them so they enhance the display without overwhelming it.
Once everything is in place, step back and check that logos are visible, fabrics are smooth, and the overall setup looks balanced. Make any final tweaks before the event begins.
Maintenance and Care Tips
Once your display is set up and looking great, regular maintenance will help keep it in excellent condition for future events.
Cleaning Your Display:
After each event, wipe down the tent frame with a damp cloth to remove dirt and dust. For fabric surfaces like the canopy, table covers, and flags, use a soft brush or sponge with mild soap and lukewarm water to clean any stains. Work in circular motions and rinse with clean water. Avoid using bleach or harsh chemicals, as they can damage the fabric and cause colors to fade. If your tent gets wet, set it up in a dry, ventilated area to air-dry completely before packing it away – storing damp materials can lead to mold and mildew.
For table covers, shake off debris and address spills or stains immediately. Allow them to air-dry flat or hang them to dry. If folding is necessary, try to follow the natural seams to reduce creases.
Flags, which are often exposed to the elements, should be inspected after every use for tears, fraying, or fading. Make sure they’re completely dry before storing them to prevent mold or mildew.
Proper Storage Practices:
Store your tent, table covers, and flags in a cool, dry place away from direct sunlight. Prolonged exposure to heat or humidity can cause mold growth and fading. Keep your tent in its carrying bag or a protective case when not in use. Fold flags neatly to minimize fabric stress, and never store them while damp. Use protective covers or containers to keep everything free from dust and pests, and check their condition periodically if stored for an extended time.
Material Quality and Routine Inspections:
The longevity of your display often comes down to the quality of the materials. For tents, 600D polyester is a durable choice – it resists wear and tear, blocks 98% of UV rays, and often meets fire-resistant standards (CPAI-84). Many also feature waterproof PVC coatings for added protection. Flags made from polyester are lightweight and fade-resistant, while vinyl flags are sturdier for harsher weather. Fiberglass flag poles are a strong option for outdoor setups, as they resist bending or breaking better than aluminum ones.
Regular inspections can help you catch small issues before they become big problems. Check the tent frame for bent parts or loose connectors, inspect fabric panels for loose stitching, and test zippers or velcro fasteners to ensure they’re secure. Look over flag poles for cracks or weak spots, and address any minor damage right away.
It’s also a good idea to have a small repair kit on hand. Pack essentials like fabric tape, extra stakes, spare clips, and a multi-tool for quick fixes during setup or even mid-event. These small preparations can save you from unnecessary stress and keep your display looking its best.
Adjusting Your Setup for Different Event Types
Every event comes with its own set of challenges. Tailoring your tent, table covers, and flags to suit either indoor or outdoor conditions ensures your display remains polished and professional.
Indoor Event Setups
Indoor events – think trade shows, conferences, and expos – offer controlled environments with predictable lighting and climate. In these settings, the goal is to maximize visibility while creating a welcoming atmosphere.
- Space and Layout:
Indoor spaces are often tight, so plan your layout wisely. Position your canopy at the back to create a defined backdrop, leaving the front open to encourage visitor flow. Place your table at a comfortable distance from the entrance and use flags as vertical markers near entry points, ensuring they don’t obstruct the view. - Lighting Tips:
Indoor lighting can sometimes dull colors or create unwanted shadows. Portable LED lights can help enhance visibility, and contrasting colors on your table cover can make your branding pop. - Comfort and Climate Control:
With climate-controlled venues, you can focus on aesthetics rather than weatherproofing. Lightweight materials work well here, and you can confidently display printed materials or electronics. For crowded or warm spaces, set up your booth to encourage airflow and openness. - Flooring and Stability:
While most indoor surfaces are stable, carpeted areas might require some adjustments. Use weighted bases for your flags if necessary, and double-check that your table is level so your table cover hangs neatly.
Outdoor events, on the other hand, require a more durable and weather-ready setup.
Outdoor Event Setups
Outdoor events like farmers’ markets, street fairs, or festivals come with challenges like unpredictable weather, uneven ground, and prolonged exposure to the elements. Here’s how to prepare:
- Weatherproofing:
Opt for a tent made from waterproof and UV-resistant materials. Add side panels to shield your booth while keeping it accessible. Use water-resistant table covers with secure fastenings to prevent them from shifting in the wind. - Managing Flags in Windy Conditions:
High winds may require you to lower or remove flags. For moderate winds, position flags so they face into the wind, reducing strain. - Anchoring Your Setup:
Secure your tent and flags with stakes on soft ground or weighted bases on hard surfaces. Ensure flagpoles are properly stabilized to handle varying conditions. - Sun and Heat Protection:
Position your tent to minimize direct sunlight and consider portable fans for better air circulation. Keep an eye on materials for signs of fading or wear, replacing them as needed. - Adjusting for Uneven Terrain:
Use adjustable supports to level your tent and table on uneven ground. Position flags where they won’t be impacted by the terrain. - Multi-Day Event Prep:
For events lasting several days, regularly check your anchors and supports. Secure loose items overnight to protect them from dew or unexpected weather. Lower flags or cover your table during off-hours for added protection. Keeping tabs on weather forecasts will help you stay ahead of potential issues.
Conclusion
Creating a professional event setup doesn’t have to be complicated. By combining a custom canopy tent, branded table cover, and promotional flags, you establish a cohesive, eye-catching display that strengthens your brand identity.
The foundation of a great setup lies in consistent branding. Matching colors, logos, and messaging across all elements creates a unified look that reinforces your brand’s presence.
It’s also important to invest in durable, high-quality materials. Features like weather-resistant fabrics, secure anchoring systems, and regular upkeep ensure your setup remains in top condition and delivers value over time.
This setup is versatile, too. You can easily tweak it to suit the event type, venue size, or weather conditions without starting from scratch. Indoor events allow you to focus on aesthetics and visitor interaction, while outdoor events demand more attention to stability and weatherproofing. Either way, the same core elements work to your advantage, giving you the flexibility to adapt to any situation.
With thoughtful planning, careful assembly, and proper maintenance, your tent, table cover, and flags will work together seamlessly. The result? A standout event presence that effectively showcases your brand and leaves a lasting impression.
FAQs
What should I consider when choosing the right size and style of a canopy tent for my event?
When choosing a canopy tent, it’s important to think about a few key elements to make sure it meets your event needs and helps showcase your brand effectively. Start by considering the type of event you’re hosting and the audience you want to engage. This will guide decisions on the tent’s size and layout. For example, a large trade show might call for a spacious setup, while a smaller, local fair could benefit from a more compact option.
Your tent should also reflect your branding goals. Incorporate your logo and use colors that represent your brand identity. Visibility is another crucial factor – your branding should stand out and be easy to spot from a distance to draw people in. Lastly, take into account the space available at the venue and whether you’ll need features like sidewalls or other accessories to create a professional and inviting setup.
How can I make sure my table cover and flags match my brand’s colors and message?
To make sure your table cover and flags reflect your brand accurately, begin by incorporating your official logo and sticking to your brand’s main color palette. Consistency matters – align the colors, fonts, and messaging across all materials to create a unified appearance.
When crafting the design, focus on readability and strong visual appeal. Opt for high-quality graphics and keep the text minimal to avoid a cluttered look. This strategy helps your branding grab attention and leave a lasting impression on your audience.
How can I maintain and store event setup materials to ensure they stay in great condition for future use?
To keep your event setup materials – like tents, table covers, and flags – in great shape, regular care and proper storage are key. After each event, take the time to clean everything thoroughly to remove dirt, stains, or debris. For fabric items, always check and follow the manufacturer’s care instructions. This might mean hand washing or using a gentle machine cycle with a mild detergent.
Make sure all items are completely dry before putting them away. This step is crucial to avoid mold or mildew. Store everything in a cool, dry place, away from direct sunlight and extreme temperatures. Use protective bags or containers to guard against dust and potential damage. For flags and banners, roll them instead of folding to avoid creases, and keep poles or frames neatly organized to prevent them from bending or getting lost.
Taking these simple steps can help your event materials last longer and keep them looking polished and professional for every occasion.


