


Want your brand to stand out at events across multiple locations? Custom tents are an effective way to create a consistent, professional presence – whether you’re at a farmers’ market in Portland or a trade show in Atlanta. Here’s why they work:
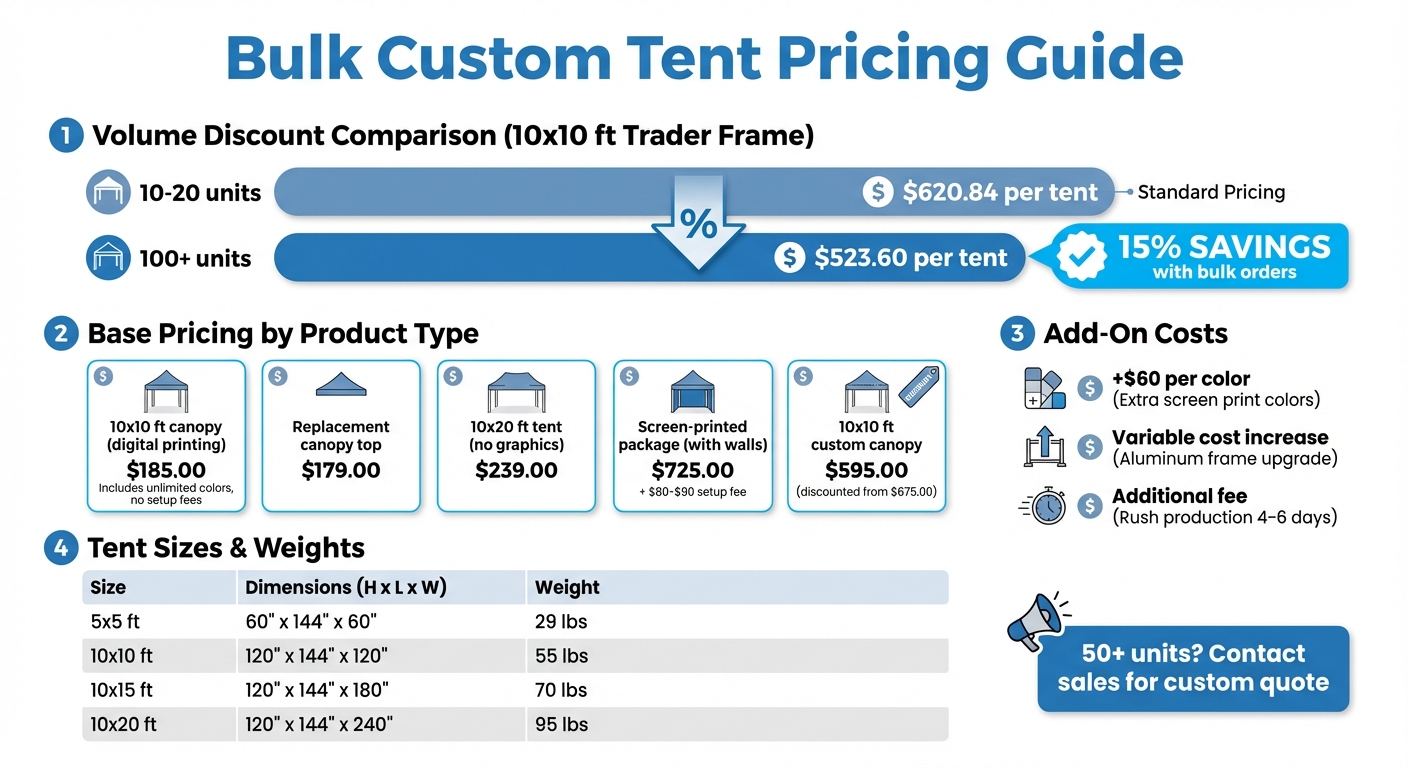
- Cost Savings: Bulk orders reduce per-unit costs by up to 15%. For example, a 10×10 tent drops from $620.84 to $523.60 when ordering 100+ units.
- Uniform Branding: High-quality dye-sublimation printing ensures vibrant, weather-resistant designs with consistent logos and colors across all locations.
- Ease of Use: Simple setup (under 5 minutes) and interchangeable accessories streamline event preparation.
These tents are built for durability, using 600D UV-coated polyester and sturdy frames to handle repeated use. Whether you’re ordering one tent or 50, Peak Banner offers flexible pricing, free design services, and fast production times (5–7 days). Keep reading for detailed insights on pricing, customization options, and management tips for multi-location businesses.
Why Order Peak Banner Custom Logo Canopy Tents in Bulk

Lower Costs with Volume Discounts
Buying in bulk can significantly reduce costs per unit. For instance, ordering 10–20 units of the 10×10 "Trader" frame costs around $620.84 each, but the price drops to about $523.60 per tent when ordering 100 or more – a savings of 15%. Peak Banner also offers free in-house design services with a quick 1–2-hour turnaround. Plus, bundling tents with accessories like custom side walls, flags, and table covers can unlock even better package deals. Coordinated shipping across multiple states further minimizes administrative hassle.
These tents are built to last. Made with 600D UV-coated polyester and sturdy commercial-grade steel or aluminum frames, they’re designed for repeated use at multiple events. Their durability means fewer replacements, making bulk purchases a smart investment for businesses with multiple locations.
"We needed a few different product types and our agent was able to bundle everything together for a great deal." – Customer Testimonial, Peak Banner
Uniform Branding Across All Locations
Cost savings aside, visual consistency is key for businesses operating in different locations. Whether your team is at a farmers’ market in Seattle or a trade show in Miami, bulk orders ensure every tent is identical. Using the same design template, vector files, and Pantone color matching creates a cohesive look – no mismatched logos or colors.
Professional suppliers utilize dye-sublimation printing, a method that permanently bonds ink to polyester. This ensures graphics won’t crack, peel, or fade, keeping your brand looking sharp through countless events. A polished, professional appearance helps make a lasting impression and builds trust with customers who see your business in various settings.
"A branded tent helps you stand out in crowded spaces, boost visibility, and create a professional, unified presence for your business or organization at any event." – Peak Banner
Standardized tents also mean all locations get the same high-quality materials. Whether it’s a 10×10 or 10×20 tent, the consistent design acts as a "mobile billboard", reinforcing your brand wherever it’s displayed.
Simpler Event Planning and Setup
Using the same tent model across locations makes event planning and setup much easier. Staff training becomes simpler, as everyone works with the same equipment. Accessories like side walls, weights, and rain gutters are interchangeable, streamlining operations. Additionally, suppliers handle shipping logistics for bulk orders, reducing your workload.
Suppliers also keep your design files on hand, so reordering replacement parts or additional canopy tops is hassle-free – no need for new setup fees.
"Appreciate the customer service providing a quantity discount and walking me through the order smoothly." – Customer Testimonial, Peak Banner
Maintenance is straightforward when you source from a single provider. Spare parts are always compatible with your inventory, making replacements quick and easy. This level of standardization ensures smooth inventory management and simplifies event setups for all your locations.
sbb-itb-c623e60
Peak Banner Bulk Pricing for Custom Logo Canopy Tents
Bulk Custom Tent Pricing Tiers and Volume Discount Comparison
Price Tiers by Order Quantity
The pricing for custom canopy tents depends on the printing method (digital or screen) and the frame material (steel or aluminum). There’s no minimum order requirement, so businesses can choose to order a single tent or a large batch.
For a standard 10×10 ft canopy tent with full-color digital printing, prices start at $185.00, which includes unlimited colors and logos without setup fees. If you need a replacement canopy top for an existing frame, those start at $179.00. Larger tents, like the 10×20 ft size without graphics, begin at $239.00.
Screen-printed packages, which include back and side walls, are priced around $725.00, with a one-time setup fee of approximately $80–$90. For bulk orders, this setup fee is spread across all units, lowering the overall per-unit cost. If you’re ordering 50 or more tents, it’s a good idea to contact the sales team directly for a custom quote to access the best discounts.
Let’s take a look at how custom features and add-ons can impact pricing.
Extra Costs for Custom Features and Add-Ons
Digital printing includes full-color graphics in the base price, but screen printing covers only a single-color logo. Adding extra colors to a screen-printed design costs $60 per color. Upgrading the frame from the standard heavy-duty powder-coated steel to a lighter, rust-resistant aluminum frame also increases the cost. Depending on the chosen frame, a complete 10×10 ft tent kit typically weighs between 45 and 70 lbs.
If you need faster production, rush orders (4–6 days instead of the standard 7–10 days) come with an additional fee. These options allow businesses to customize their tents while managing their budgets effectively.
Shipping and Production Savings with Bulk Orders
Bulk orders not only reduce per-unit costs but also streamline logistics, making them a cost-effective choice. Fixed costs like setup fees are distributed across all units in larger orders, significantly lowering the price per tent. Additionally, bundling items like tents, flags, and table covers into a single event bundle set reduces shipping costs.
Consolidated shipping simplifies the process by cutting down on the number of separate deliveries and the administrative work involved. For businesses with multiple locations, working with a dedicated project manager ensures tailored pricing plans that align with specific rollout needs, maximizing both savings and convenience.
Customization Options for Uniform Branding
Standardized customization ensures your brand stands out consistently at every event, combining eye-catching visuals with long-lasting materials.
Full-Color Printing and Logo Placement
Peak Banner uses dye-sublimation printing, a method that embeds ink directly into the fabric, resulting in vibrant, permanent graphics. This technique supports unlimited colors and provides edge-to-edge coverage across the entire canopy, including all four peaks and valances. The result? 360-degree brand visibility with no awkward blank spaces or borders.
Place your logo on the peaks for maximum visibility from a distance, while the valances are perfect for taglines or contact details. This thoughtful layout ensures your brand gets noticed both up close and across the event area. To achieve sharp, professional results, submit your artwork in vector formats like AI, EPS, or PDF. Plus, you can take advantage of free design assistance to keep your branding consistent across all units.
These advanced printing options pair perfectly with a variety of tent sizes and configurations.
Available Sizes and Design Options
Peak Banner offers four standard tent sizes to meet different event needs.
- The 10×10 ft tent (120" x 144" x 120", 55 lbs) is a great fit for vendor booths.
- The 5×5 ft tent (60" x 144" x 60", 29 lbs) is ideal for smaller spaces like registration tables.
- The 10×15 ft tent (120" x 144" x 180", 70 lbs) and 10×20 ft tent (120" x 144" x 240", 95 lbs) provide extra room for larger setups, such as food vendors or busy exhibitions.
You can further customize your tent with optional features like full back walls, side walls, half walls, zippered doors, and mesh walls, creating a branded environment that fits your specific needs. For the frame, choose between powder-coated steel for added stability or lightweight aluminum for easier transport.
Durable Materials for Repeated Use
While great visuals are essential, durability is just as important for events in multiple locations. Peak Banner canopies are made from 600D polyester, a material that’s water-resistant, UV-protected, and flame-retardant, making it perfect for outdoor use. Frames are built to handle wind speeds up to 30 mph when properly secured, and the matte finish minimizes glare for consistent visibility.
"The material was super thick… happy with purchase." – Sam @ G1 Detailing
To keep your canopy looking professional, clean it with mild soap and water, ensuring it’s completely dry before storing to avoid mold or mildew. Plus, Peak Banner stores your design files, making reordering for new locations simple and accurate.
How to Set Up Peak Banner Pop-Up Tents
Once you’ve customized and ordered your Peak Banner pop-up tent, you’ll want to ensure it’s set up properly to make the most of your investment. These tents use a simple expand-and-snap mechanism that requires no tools and can be assembled in under five minutes. While one person can manage the setup, having two people makes the process faster and helps keep the canopy clean.
Pre-Event Preparation Checklist
Before heading to your event, unpack the tent’s carrying case and confirm that all components are included – this typically means the frame, printed canopy, and any accessories like stakes or weights. Inspect the frame for any damage, such as bent poles or loose bolts, from prior use or transport.
To protect your custom-printed canopy during setup, lay down a large tarp or drop cloth to prevent dirt or tears. Also, make sure the canopy is completely dry; storing damp fabric can lead to mold or mildew, which could ruin the material. It’s a good idea to do a quick test run at home to ensure everything works smoothly and to familiarize your team with the setup process. Once you’re confident everything is in order, you’re ready to assemble.
Tent Assembly Instructions
Position the collapsed frame upright in your chosen setup area and expose the inner frame. Place the printed canopy over the partially expanded frame, aligning its edges with the corner poles. Expand the frame fully until you hear a click and lock sound at each corner – this ensures the structure is secure.
Next, fasten the adjustable straps or Velcro points around the frame to keep the canopy tight and free of wrinkles. Adjust the telescopic legs to your preferred height, making sure all four legs are set to the same height to maintain stability. Uneven legs can compromise the tent’s balance. Once assembled, anchoring the tent is essential to keep it steady.
How to Secure Tents Safely
Secure your tent immediately after setup, even if the weather seems calm. On soft surfaces like grass, use metal stakes through the corner loops and secure them with ropes for extra hold. On harder surfaces like concrete, use weight plates (at least 40 lbs per corner for a 10×10 ft tent) or sandbags wrapped around each leg.
For windy conditions, combine both stakes and weights for added stability. When it’s time to take down the tent, always remove the anchors last to prevent the frame from being caught by the wind before you pack it away.
Managing Tents Across Multiple Event Locations
Once you’ve nailed the setup process, the next challenge is managing your tents across various events. Keeping your inventory organized is key to avoiding headaches like missing or damaged tents showing up at critical moments. A lack of planning can lead to last-minute chaos, which no one wants when the spotlight’s on.
Organizing Tent Inventory and Logistics
Think of your tents as valuable business assets that need proper tracking. Using inventory management software can help you monitor tents across different locations. Assign specific storage spots – like warehouse shelves, delivery trucks, or even individual tents labeled with serial numbers. This system allows you to know exactly where each tent is at any time, whether it’s sitting in storage, en route, or already set up at an event.
If your business experiences seasonal demand spikes, partnering with a Third-Party Logistics (3PL) provider can be a game-changer. Many 3PL providers offer next-day or 2-day shipping to most of the U.S., letting you handle busy seasons without the need for extra warehouse space. To avoid mishaps, create virtual sublocations in your tracking system for items marked as "Returns", "Damage", or "RMA." This ensures damaged equipment doesn’t accidentally end up at an event. A well-organized inventory system keeps your operations smooth and consistent, no matter how many locations you’re managing.
Tent Placement for Better Brand Visibility
Tent placement can make or break your booth’s impact. Attendees form impressions in seconds, so your tent needs to stand out. Use the tent’s peak to display your large logo – this is the area people will notice from a distance. Save the valance (the strip at eye level) for details like your website or social media handles.
Before the event, confirm your booth location with coordinators. If you’re in a corner, focus your branding on the front-facing sides. For spaces accessible from all directions, ensure all sides are branded clearly. In tight spaces, like farmers’ markets, straight-legged tents work better because they fit smaller footprints. On the other hand, slanted-leg designs provide extra stability in open, windy areas. vendors who use half-walls and backwalls and tall flags often see a 28% increase in walk-ins, as open layouts feel more inviting than fully enclosed setups.
Training Staff on Setup and Maintenance
Your team plays a huge role in keeping your tents in great shape. Consistent training on assembly and care is essential to protect your investment. Teach staff the "never walk away" rule – weights should always be the last thing removed during teardown to prevent wind damage.
Make sure they inspect frames for bent poles or loose bolts before every event. Also, stress the importance of storing the canopy completely dry – damp fabric leads to mildew, which can ruin your tent over time. A simple checklist covering frame inspections, anchoring methods for different surfaces (like grass or pavement), and post-event cleaning can go a long way. When everyone follows the same process, your tents stay in better condition, look professional, and reinforce your brand’s presence at every event.
Conclusion
Managing tents across multiple locations doesn’t have to drain your budget or complicate logistics. Peak Banner’s bulk custom tents provide a cost-effective solution with volume discounts, consistent branding through vibrant full-color dye-sublimation printing, and durable materials designed for repeated use. Crafted with 600D UV-coated polyester and heavy-duty frames, these tents are built to endure event after event. Plus, the quick setup – under 5 minutes – keeps your team focused and efficient.
These tents go beyond just cost savings and branding. Streamlined operations make event management much easier. Dedicated project managers handle complex orders, and free visual mockups are ready within 1–2 hours. You won’t have to juggle multiple vendors or worry about inconsistent designs. Even reordering becomes a breeze with archived design files, ensuring every new tent matches your brand perfectly.
Whether you need tents for five locations or fifty, Peak Banner offers unmatched flexibility. With production times of just 5–7 business days, nationwide shipping, and no minimum order requirements, you can start small or scale up to meet your needs. For example, the 10×10 ft custom canopy tent starts at $595.00 (discounted from $675.00), with even better pricing available for bulk orders.
If your business relies on presenting a polished, professional image at events, investing in quality custom tents is a smart choice. Peak Banner’s 5.00 out of 5 customer rating highlights their reliability and commitment to customer satisfaction. For large-scale rollouts, reach out to their sales team for custom quotes. Bundling tents with matching flags and custom table covers not only enhances your setup but can also unlock additional savings.
FAQs
How many tents should I order for the best bulk discount?
If you’re looking to maximize savings, consider ordering 10 or more tents. Bulk purchases often come with volume discounts, allowing you to reduce costs significantly as your order size increases.
What artwork files do I need for accurate color matching?
To submit artwork files, use vector formats such as AI, EPS, or PDF. Alternatively, high-resolution JPG or PNG files are acceptable. Make sure the files are in CMYK color mode and have a resolution of at least 150 dpi to ensure accurate color reproduction.
What’s the best way to store and track tents across locations?
To manage and track tents across various locations, it’s essential to have a well-structured inventory management system in place. Combine digital tools for tracking and dispatch planning with physical solutions like designated storage spaces. This approach ensures that tents are easy to locate, retrieve, and manage, particularly during peak seasons. A properly maintained system simplifies operations and ensures your tents are readily available whenever and wherever they’re needed.


