


You’ve got seconds to grab attention at a trade show. A high-converting booth needs to stand out visually, communicate your message clearly, and guide visitors toward action. The key? Use three essential tools: custom tents, feather flags, and table covers.
- Tents define your space, showcase your brand, and offer shelter. Choose the right size, durable materials, and bold designs for maximum visibility.
- Feather flags act as vertical billboards, drawing attention from across the venue. Position them strategically and use high-contrast designs for quick readability.
- Table covers add a polished look, hide clutter, and reinforce your branding. Use them to display logos, taglines, or QR codes.
Each element works together to create a professional, eye-catching booth that drives results. Start by selecting a tent that fits your space, add flags for visibility, and complete the setup with branded table covers. Together, these tools can turn your booth into a powerful marketing asset.
Step 1: Select the Right Custom Canopy Tent
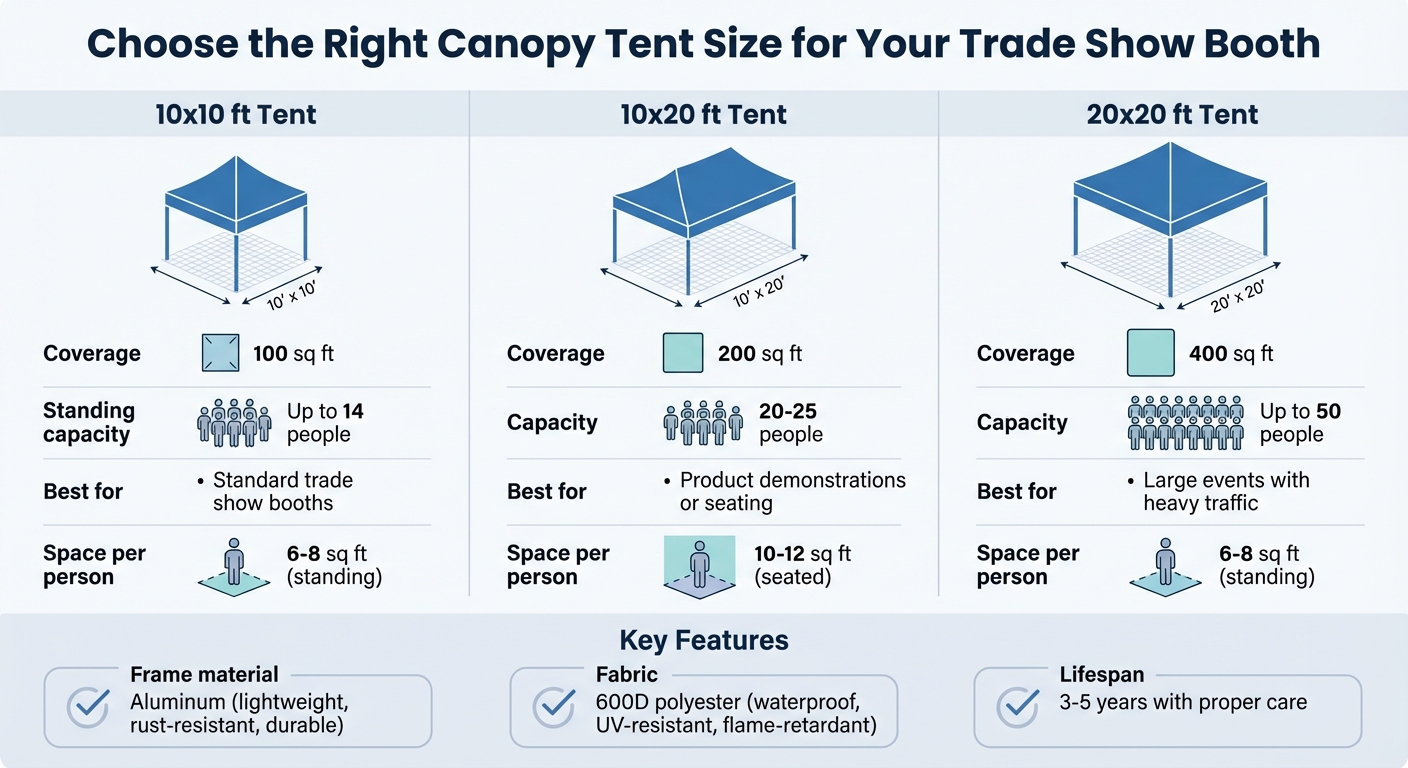
Trade Show Canopy Tent Size Comparison Guide
Your custom canopy tent is the heart of your booth – it defines your space, shields your team from the elements, and acts as a branded landmark visible from across the event. Choosing the right tent means finding the perfect balance between size, design, and durability to meet your goals and budget.
Pick the Right Size and Features
Start by measuring your booth space and checking for any height restrictions at the venue. A 10×10 ft tent is the standard size for most trade shows, offering 100 square feet of coverage – enough for up to 14 standing guests. If you need room for product demonstrations or seating, a 10×20 ft tent doubles the space to 200 square feet, comfortably accommodating 20–25 people. For larger events with heavy traffic, a 20×20 ft tent provides 400 square feet of space, hosting up to 50 attendees.
When estimating capacity, keep these guidelines in mind: each standing person requires 6–8 square feet, while seated guests need 10–12 square feet. You can also enhance your booth’s functionality with features like full or half walls for extra branding and weather protection. Adding awnings helps create clear entry points and adds another layer of visual appeal. For example, the back wall of a 10×10 canopy offers a prime spot for showcasing your logo or message.
For the frame, aluminum is your best bet. It’s lightweight, rust-resistant, and durable enough to handle frequent travel. Steel frames may be cheaper upfront, but they’re heavier and prone to rust if the protective coating gets damaged. When it comes to fabric, stick with 600D polyester – it’s waterproof, UV-resistant, and flame-retardant, ensuring it can handle a variety of conditions.
Design for Maximum Visibility
Your canopy offers eight key branding areas: four peaks (the triangular top sections) and four valances (the vertical strips that hang around the edges). Use the peaks for bold logos or striking imagery – they’re visible from a distance and help draw attention to your booth. Avoid text on the peaks, as the natural slope of the fabric can make it hard to read.
"The peaks are the upper triangular sections of your canopy top. They are the largest area of printed fabric which make them perfect for images, but not for text." – Impact Canopies USA
Valances, which sit 14–18 inches above the ground, are perfect for your website, tagline, or QR codes. These lower areas are easy for passersby to spot and scan. To keep your branding vibrant and long-lasting, opt for dye-sublimation printing – this method embeds the ink into the fabric, preventing cracking or peeling over time.
"A clean, bold canopy is the #1 factor in whether people recognize your brand quickly and correctly. Overdesigning kills clarity and premium perception." – Nicole Falkiewicz, TentCraft
Consistent branding across your tent and other materials can increase revenue by up to 23%. Keep your canopy design simple and bold to ensure it stands out from afar, and save detailed storytelling for eye-level elements like walls or branded table covers.
Ensure Stability and Versatility
A collapsing tent can ruin your booth’s professionalism. Always secure your tent with weight bags, footplates, or ground spikes – especially for outdoor events where wind is a concern. Indoors, footplates provide stability without damaging the flooring. With proper care, a quality tent can last 3–5 years. Clean it with mild soap and water, and always store it dry to prevent mold.
Look for a frame with telescoping legs and quick-release buttons for easy setup and takedown. If you’re exhibiting in different climates, modular walls can be a game-changer. In colder weather, sidewalls and heaters can keep your team comfortable, while mesh walls are great for summer events – they allow airflow while maintaining a branded barrier.
Once your tent is set up and ready to impress, the next step is to boost your booth’s visibility with well-placed feather flags.
sbb-itb-c623e60
Step 2: Use Feather Flags to Increase Booth Visibility
Feather flags act like vertical billboards for your booth, standing tall above the crowd and standard pipe-and-drape setups. With heights ranging from 8 to 15 feet, they serve as visual landmarks, helping attendees spot your booth from across the exhibition hall – even in the busiest venues.
Position Feather Flags Strategically
The placement of your feather flags can make or break their effectiveness. Position them at your booth edges or corners to frame your space and naturally guide foot traffic inward. Pairing flags at entry points creates a welcoming path, encouraging attendees to step in and explore. A popular option, such as a 12-foot flag on a 15-foot pole (priced around $127.99), offers enough height to stand out from various angles in large spaces.
For indoor events, stabilize your flags with a cross-base and weighted water bag to protect flooring while keeping them secure. Outdoor setups, on the other hand, require ground spikes to anchor the flags firmly in soil or grass. Smaller 5 to 6-foot flags can also be placed near entrances or scattered around the venue as wayfinding tools, directing visitors to your booth.
Once your flags are positioned, the next step is to ensure their design catches attention instantly.
Design with Bold Messaging
Your flag’s design should grab attention in under three seconds – the time it takes for attendees to walk by. Use high-contrast colors like bright backgrounds with bold black text, paired with block fonts for maximum readability. For outdoor events, lettering between 4 and 10 inches tall ensures visibility from up to 30 feet away.
Place your logo and branding near the top of the flag so they remain visible even when crowds obscure the lower portion. The bottom half is ideal for QR codes or promo codes – adding these can make a big difference. For example, one event saw a 35% increase in digital engagement scans simply by including QR codes on feather flags. If your booth is in a high-traffic area with attendees approaching from multiple angles, go for double-sided flags with a block-out layer to ensure your message is readable from both sides.
Choose Durable Materials and Easy Setup
Durability is key when choosing feather flags. Opt for 2.6 oz knitted polyester fabric, which resists UV damage and holds vibrant prints without creasing during transport. Pair this with poles made from fiberglass, aluminum, or carbon composite fiber – materials that flex under wind pressure without breaking. Most flag kits come with modular poles and a bungee cord system, making setup quick and hassle-free.
With proper care, feather flags can last 6 to 12 months outdoors. To extend their life, store them dry and rolled loosely instead of folded, and clean them with mild detergent to prevent fading. Avoid packing them away wet to prevent mildew. Starting at just $49, feather flags offer a budget-friendly way to enhance your booth’s visibility across multiple events.
With feather flags in place, your booth is ready to stand out. Next, it’s time to focus on another key element: custom table covers.
Step 3: Complete the Look with Custom Table Covers
Table covers can turn simple folding tables into polished, branded assets. They hide clutter, protect surfaces, and enhance your booth’s overall presentation. Starting at just $55, they’re an affordable way to elevate your display and make a lasting impression.
Choose the Right Type of Table Cover
Most trade show tables are 6–8 feet long and 2 feet wide, so it’s important to pick the right style of table cover. Options include:
- Stretch covers: These provide a snug, seamless fit for a sleek, modern look.
- Fitted covers: Offer a tailored appearance with clean lines.
- Traditional throws: Flexible enough to fit various table sizes.
Think about functionality, too. A 3-sided (open back) cover makes it easy to sit behind the table and access supplies stored underneath. A 4-sided cover with a rear zipper offers a polished, all-around professional look while still allowing for hidden storage – ideal for booths visible from every angle.
Your table cover should match the rest of your booth design to maintain a unified, professional appearance.
Create a Unified Design
Once you’ve chosen the type, focus on creating a design that ties in seamlessly with your tent and flags. Stick to your brand’s Pantone color values and use the same fonts across all materials. Place your high-resolution logo prominently on the table’s drop, ensuring it’s within the natural line of sight. Keep key graphics at least 20 inches off the floor for better visibility.
"A branded table cover not only enhances the visual appeal of your booth but also communicates credibility and consistency, making your company more memorable and trustworthy." – TentCraft
For the best results, opt for dye sublimation printing, which embeds ink into the fabric to prevent cracking. Use vector files or high-resolution images (at least 150–300 dpi) to ensure crisp, clear graphics without pixelation.
Practical Benefits of Table Covers
Table covers aren’t just about looks – they’re practical, too. They keep your booth organized by concealing storage boxes, wires, and personal items. Polyester covers are wrinkle-resistant and machine washable, making them easy to maintain. For outdoor events or product sampling, vinyl covers with liquid-repellent properties are a smart choice. You can even add a QR code with a message like “Scan for Show Offer” to engage attendees in a modern, interactive way.
The hidden space under fitted or stretch covers also provides a secure spot to stash extra marketing materials or supplies, keeping them close at hand when you need them most.
Step 4: Arrange a Functional Booth Layout
Creating a well-thought-out booth layout helps unify your display elements, making your space both inviting and effective at engaging attendees. The secret? Position each piece – like your tent, flags, and table – so they complement each other rather than compete for attention.
Arrange Booth Elements for Optimal Flow
Your 10×10 custom canopy tent serves as the centerpiece of your booth, acting as a mobile headquarters for your brand. Use the tent’s peaks and valances to showcase your logo or key imagery, ensuring your brand is visible even from a distance.
Feather flags are perfect for grabbing attention. Place them strategically, such as on the canopy legs or at the booth’s entrance, to maximize visibility. Even a slight height advantage can make a big difference in drawing eyes to your booth. When setting up your table, avoid placing it front and center where it could block the entrance. Instead, position it slightly off-center or to the side, creating an open and welcoming space for attendees to step in and engage.
Follow the 60-30-10 rule: dedicate 60% of the space to open engagement, 30% to areas for focused interactions, and 10% for conversions, like closing sales or collecting sign-ups. Since most people scan from left to right, arrange your booth elements to tell a logical story or lead visitors through your products or services. Keep at least 3–4 feet of aisle space within your booth to avoid crowding. Fun fact: nearly half (48%) of trade show attendees are drawn to booths with eye-catching displays, so make every element count.
By creating a layout that’s both functional and visually appealing, you’ll not only make setup easier but also create a space that naturally draws people in.
Use Event Bundles for Quick Setup
If you’re looking to save time and ensure a polished look, event bundles are a game-changer. These bundles typically include essentials like a canopy, flags, and table covers, all designed to match perfectly. This eliminates the hassle of trying to coordinate colors and designs on your own. Plus, they’re built for convenience – lightweight materials like aluminum or fabric make them easy to transport and set up.
For smaller teams or those working under tight deadlines, a ready-to-go branded booth kit can be a lifesaver. You’ll spend less time fumbling with setup and more time connecting with attendees, which is exactly where your energy should go. A streamlined setup doesn’t just save time – it ensures your booth looks professional and cohesive, leaving a lasting impression on visitors.
Step 5: Optimize Booth Design for Conversions
Once your custom tent, feather flags, and table covers are ready, the next step is to fine-tune their design to turn casual passersby into actual leads. A booth that simply looks great isn’t enough – strategic placement and testing are what transform it into a conversion machine.
Here’s how to position your graphics to maximize engagement and results.
Place High-Impact Graphics Strategically
Your booth graphics need to grab attention in just 3–5 seconds, so their placement is critical. Key elements like logos, taglines, and benefits should be positioned in the top third of your graphics, at least 3 to 4 feet off the ground. This ensures they stay visible, even if people or furniture block lower areas.
Think of your booth design as having three visual layers:
- 30+ feet away: Use bold logos and high-contrast colors on your tent canopy or tall feather flags to draw attention from afar.
- 10–15 feet away: Highlight benefit-driven headlines on banners that answer, “Why should I care?”
- 1–3 feet away: Include detailed information, QR codes, or product specs on table covers to engage those already interested.
"Keep key messaging in the top third of your graphics – right at eye level. Consider where furniture, shelving, and people will be so your message isn’t blocked or lost in the layout." – Linda Chandler, GES
Another tip: follow the 40% rule. Reserve at least 40% of your graphic space as negative space to avoid overwhelming viewers and make your message stand out. On table covers, ensure critical graphics are at least 20 inches off the floor so they’re always visible. Use the valances of your tent for secondary messaging, like your website or social media handles, while keeping the tent top reserved for a bold, high-contrast logo.
Once your layout is in place, it’s time to test and refine.
Test Layouts and Measure Success
Before the event, use booth visualizers or mockups to experiment with color schemes and graphic placement. During the event, observe how visitors interact with your booth. Are they stopping at the entrance or gathering in a specific spot? These patterns can highlight areas for improvement.
Set clear, measurable goals to guide your design choices. For example, instead of a vague goal like “generate leads,” aim for something specific like capturing 150 qualified contacts and booking 20 demos.
"Your booth’s goal should be specific enough to guide decisions. ‘Generate leads’ is too vague. ‘Capture 150 qualified contacts and book 20 demos’ is a filter for every design choice that follows." – Emma W., Snapbar
Track metrics like dwell time (how long visitors stay), cost per lead (total event cost divided by qualified leads), and lead-to-customer conversion rates. For example, Abbott Labs won Gold at the 2025 Experience Design Awards by incorporating bio-wearable quizzes and on-site health screenings in their CES booth. This interactive approach turned passive observers into active participants, proving that purposeful engagement drives results – even in smaller spaces under 50′ x 50′.
Also, monitor peak foot traffic to spot bottlenecks or underused areas. Small adjustments, like repositioning a table or feather flag, can significantly improve flow and engagement. And remember, speed matters – 78% of customers buy from the company that responds first, so quick follow-ups are just as important as great design.
Conclusion
Creating a booth that grabs attention and drives results isn’t about overloading it with branding – it’s about designing a cohesive, 3D advertisement that works from every angle. The canopy tent anchors your space, feather flags catch the eye from afar, and table covers add a polished, professional touch to your presentation.
By using consistent colors, logos, and messaging, you establish instant recognition and trust. With attendees giving your booth only a few seconds to make an impression, every detail must serve a purpose. This unified approach ensures your booth design is focused and effective.
"Think of your event setup as a 3D advertisement – every inch should work for your brand." – PrintDrill
Start with the right tent size, strategically design and place feather flags to draw attention, and use table covers that complement your design. Fine-tune the layout by positioning key visuals at eye level, experimenting with arrangements, and measuring engagement. Each piece – tent, flags, and table covers – plays a critical role in creating a booth that stands out.
Peak Banner offers everything you need for a professional booth setup, including custom canopy tents starting at $185, feather flags from $49, and table covers from $55. With full-color dye-sublimation printing, free design support, and production times of just 5–7 business days, you can bring your vision to life quickly and easily. Explore their product range and request a free mockup to see your booth come together. Put these strategies into action, and let your booth become a powerful 3D advertisement for your brand.
FAQs
What should my booth’s main call-to-action be?
Your booth’s call-to-action (CTA) needs to be clear, engaging, and tied directly to your trade show objectives. Examples like "Visit Our Website," "Learn More," "Schedule a Demo," or "Get in Touch" are simple yet effective ways to guide potential leads.
To maximize impact, place your CTA where it’s impossible to miss – on banners, signage, or even table covers. Pair this placement with persuasive, action-driven language to inspire visitors to take the next step and connect with your brand immediately.
How do I choose the best tent, flag, and table cover combo for my budget?
To find the right tent, flag, and table cover combo that fits your budget, aim for a balance between quality, size, and price. A popular option is a 10x10ft custom tent combined with matching flags and table covers, creating a unified and attention-grabbing display for around $799. You can also add budget-friendly extras like LED light sets or roller bags to boost your booth’s appeal without breaking the bank. For tighter budgets, opting for smaller or simpler setups is a smart way to save.
What’s the easiest way to track leads from QR codes at the event?
The simplest method to track leads from QR codes is by linking them to a digital lead capture form. When someone scans the code, the form opens on their phone, allowing them to input their details. From there, the information is automatically synced with your CRM. By connecting QR codes to your CRM, you can also gain insights into visitor behavior and assess the quality of the leads.


